
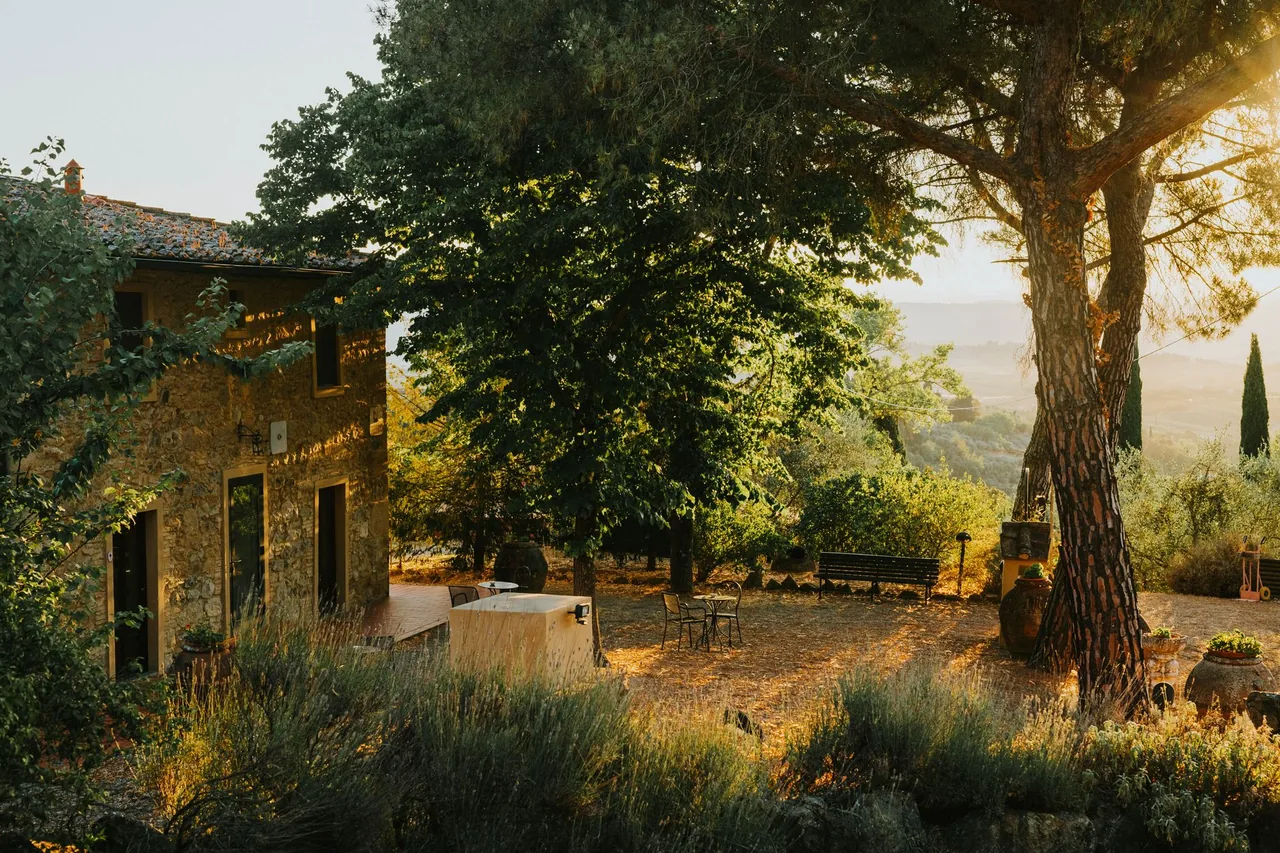
Patio installation is the process of building a stable, well-drained base in the ground and setting a finished surface on it so an outdoor living area stays flat, drains away from the house, and resists frost heave for decades. The part everyone shops for is the paver, stone, or stamped pattern on top. The part that decides whether the patio is still level in five winters is invisible: a compacted aggregate base built to the right depth and pitched to shed water. Get the base and the slope right and almost any material holds; skip them and the prettiest patio settles, puddles, and heaves within a couple of freeze cycles. Most patios are pitched at 1% to 2% away from the structure.
A Patio Is a Base-and-Drainage Job First, a Surface Job Second
The flagstone or paver you fall in love with is the layer you see and the layer that matters least to longevity. Setting the surface is the fast, satisfying part of the job. What separates a patio that stays dead-flat for fifteen years from one that develops a low spot and a birdbath puddle in two is everything that happens below it: excavating to the right depth, building a compacted stone base in lifts, screeding a precise bedding layer, locking the perimeter so the field can't spread, and pitching the whole assembly to drain.
That is why a credible installer talks about excavation and base depth before they talk about color. A paver field set on four inches of loose, un-compacted fill will rut and dish under foot traffic and furniture. A stone patio with no slope will pond water against the foundation and push it back into the basement. A surface with no edge restraint will creep outward at the borders until the joints open and the pattern unravels. None of those are material defects — they are base and drainage failures, and they are the most common reason a new patio disappoints. The surface is the easy part; the ground under it is the job.
This holds across every material. Whether the patio is built in pavers, natural stone, or stamped concrete, the base and the pitch dictate what lasts and what fails. The order of operations never changes: excavate, compact, pitch, then set the surface.
Why Patios Settle, Heave, and Pond — and How the Base Stops It
Most patio failures trace back to three things: a base that wasn't compacted, water that wasn't directed, and frost that wasn't accounted for. All three are preventable on installation day, and understanding the mechanism is the difference between buying a patio and buying a result.
Settling and rutting happen when the base was placed too thin or compacted too little, so the stone keeps consolidating under load after the surface is down. The result is dips, low rows, and pavers that rock — the patio is literally still settling because the compaction that should have happened with a plate compactor is happening slowly under your patio furniture instead. Frost heave is the cold-climate signature: water trapped in or under the base freezes, expands, and lifts the surface, then drops it unevenly when it thaws. Over repeated freeze-thaw cycles the patio ratchets out of level. The defense is a free-draining granular base that lets water move down and out instead of pooling and freezing in place. Ponding and foundation water come from missing or backward slope: a flat or in-sloping patio sends rain toward the house instead of away from it.
The prevention is unglamorous and non-negotiable. Excavate deep enough for a real base — commonly several inches of compacted angular aggregate, more in cold or clay-heavy regions. Compact in 2" to 4" lifts with a plate compactor rather than dumping it all at once. Pitch the finished surface at least 1% to 2% — roughly an eighth of an inch per foot — away from the structure. Install an edge restraint around the entire perimeter so the field can't migrate. Miss any one of these and the patio will tell on the installer within a season or two.
The Base, the Bedding, and the Drainage Plan That Come Before the Surface
Before a single paver or flag is set, a competent installer builds and verifies a layered system. For a paver patio that system is specific and the place cheap quotes cut corners.
It starts with excavation to a planned depth that accounts for the surface thickness, the bedding layer, and the base — typically removing the topsoil and any soft organics down to firm subgrade. A geotextile fabric often goes over the subgrade to separate it from the stone so the base doesn't sink into soft soil over time. Then comes the base itself: angular, well-graded crushed aggregate placed and compacted in lifts. Depth is driven by use and climate — a foot-traffic patio needs less than a driveway, and freeze-prone or clay soils need more. Each lift is compacted before the next goes on, because you cannot compact a thick layer from the top.
On top of the compacted base sits a thin, screeded bedding sand layer — typically around an inch of coarse, angular sand struck flat with screed rails — that the pavers are set into. This layer is for setting and minor leveling, not for building grade; grade is the base's job. After the pavers are laid and cut to the borders, the perimeter is locked with an edge restraint, the field is compacted again to seat the units, and the joints are filled with jointing sand — increasingly a polymeric sand that hardens to resist weeds, ants, and washout. For stamped concrete the layering differs — a compacted base, then a reinforced slab poured with control joints — but the underlying logic is identical: a drained, compacted foundation comes first. The drainage plan ties it all together: the pitch sheds surface water, and in tight or low sites a permeable paver system or a discreet drain may carry it away. Permeable assemblies in particular need an open-graded stone base engineered to hold and release water; see pavers for how those systems are built.
Choosing the Patio Material — and the Trade-off Each One Carries
The best patio material is the one matched to your climate, your maintenance appetite, and how you'll use the space — and each option trades cost, repairability, and look differently. Buying on appearance alone, ignoring how it behaves over time, is how a beautiful patio becomes a maintenance headache.
- Concrete pavers are interlocking units set over a base, and their defining advantage is that the system flexes with frost and any single unit is individually replaceable. A stained or cracked paver lifts out and a new one drops in — no patching scar. They come in a vast range of shapes and colors and, in permeable form, manage stormwater on site. The trade-off is more joints and the eventual need to refresh jointing sand. See pavers.
- Natural stone — flagstone, bluestone, travertine, granite — delivers a one-of-a-kind, high-end surface that no manufactured product fully imitates. It can be mortar-set on a slab or dry-laid on a base. The trade-offs are cost and that some stones are porous and want sealing; travertine, notably, stays cooler underfoot, which is why it migrates to pool surrounds. See natural stone.
- Stamped concrete is a single poured slab patterned and colored before it cures to mimic stone or brick, giving a seamless surface with no joints to weed. It is durable and often lower-cost per square foot, but it is a monolithic slab: it will crack at control joints over time, a crack is hard to hide, and it needs resealing every few years to hold color. See stamped concrete.
Climate overrides preference. In hard-freeze regions a flexible paver system tolerates frost movement better than a rigid slab; near a pool, a cool, slip-aware stone or paver wins. Match the material to how the patio will live before you choose the look you love. The same family of surfaces extends to the rest of the yard — a patio often shares its material and base logic with an adjoining walkway or driveway, and the whole exterior package sits within outdoor surfaces.
The Patio Installation Process, Step by Step
A professional patio build runs the same disciplined sequence every time. Each step exists to prevent a specific failure, and skipping any of them shows up later as a dip, a puddle, or a heave.
- Layout and grading plan. The installer marks the patio footprint, establishes finished elevations, and plans the slope so water runs away from the house and toward a safe outlet. This is where drainage is actually decided.
- Excavation. Topsoil and soft organics are dug out to firm subgrade at a depth that accounts for surface, bedding, and base thickness. Under-excavating to save labor is the root of later settling.
- Subgrade prep and fabric. The subgrade is compacted, and a geotextile separation fabric is laid where soils are soft, so the base stone doesn't migrate into the soil over time.
- Base construction. Angular crushed aggregate is placed and compacted in 2" to 4" lifts to the planned depth, each lift compacted before the next, building a rigid, free-draining foundation pitched to grade.
- Bedding layer. A thin, screeded course of coarse sand is struck flat with screed rails to receive the pavers — for setting and fine leveling, not for building grade.
- Setting the surface. Pavers or stone are laid to the pattern, with border cuts made cleanly; a stamped slab is poured, reinforced, stamped, and jointed at this stage instead.
- Edge restraint and compaction. A perimeter edge restraint locks the field, the surface is compacted to seat the units, and any final adjustments are made.
- Jointing and cleanup. Joints are filled with polymeric or jointing sand and set, the site is cleaned, and the installer walks the patio with you to review drainage, settling, and care.
Talk through your project — free.
A free consultation and a written, itemized quote from a vetted installer. No pressure, no obligation.
Drainage Codes, Edge Restraint, and When a Patio Needs a Permit
A patio looks like a simple surface, but it interacts with grading, drainage, and sometimes setback rules — and the conditions that protect it are as much about the site as the stone. Knowing them before the build keeps water out of your basement and the project on the right side of local rules.
The drainage requirement is the one that matters most and the one most often fudged: surface water must move away from the foundation, not toward it. A patio pitched flat or back toward the house can direct rain against the foundation wall and undermine it. A reputable installer establishes positive slope and, on tight or low lots, plans where the runoff actually goes — a swale, a permeable system, or a discreet drain — rather than just shedding it onto a neighbor's grade. Edge restraint is the structural condition for any sand-set paver patio: without a locked perimeter the field spreads, joints open, and the pattern fails from the borders inward.
Permits and rules enter the picture more often than people expect for hardscape. Many jurisdictions regulate impervious-surface coverage, lot-line setbacks, and grading that alters how water leaves your property — and a large patio can trip those thresholds. Work near a property line, in a drainage easement, or that changes site grading frequently needs review. A reputable installer will tell you when a permit or a setback rule applies rather than working around it, because a patio that violates a grading or coverage rule can become an expensive problem at resale. Material durability ties back to climate, too: in freeze regions the assembly must tolerate freeze-thaw, which is exactly why base depth and free drainage are not optional.
How to Vet a Patio Installer
Most patio failures are base and drainage failures, so the installer matters more than the paver brand. These are the questions that separate a crew that builds patios to last from one that simply lays units on dirt.
- They lead with excavation depth and base, not color
- An installer who quotes a patio without telling you how deep they'll dig and how thick the compacted base will be is guessing. Ask for the base depth and how they'll compact it — a real answer names lifts and a plate compactor, not "we'll level it out."
- They establish positive slope away from the house
- Ask exactly how water will leave the patio. A credible answer states a pitch — around 1% to 2% — and names where the runoff goes, not a vague "it'll drain fine."
- They install edge restraint on sand-set pavers
- For any paver patio, ask how the perimeter is locked. No edge restraint means the field will creep and the joints will open. A pro treats it as standard, not an upsell.
- They account for frost and soil in cold or clay regions
- In freeze-prone or clay-heavy ground, the right installer deepens the base and may add separation fabric. A one-depth-fits-all spec ignores the very thing that heaves patios.
- They explain jointing, sealing, and long-term care
- Ask what fills the joints and what maintenance the surface needs — polymeric sand, resealing intervals for concrete or porous stone. The answer tells you whether they're thinking past the install day.
A Real Outdoor-Surface Decision
The clearest way to see why the base decides everything is to walk through one representative scenario where drainage and frost, not the paver, drove every call.
Our Patio Installation Standards
Pro Work Home Surface is not a contractor and does not build your patio — we match you with vetted local installers and hold them to a published bar. These are the standards we expect on every patio project we connect.
- Compacted base before any surface
- The patio is excavated to firm subgrade and built on an angular crushed-aggregate base compacted in 2" to 4" lifts to a depth matched to your climate and use — not a thin layer of fill leveled by eye.
- Positive slope away from the structure
- The finished surface is pitched at least 1% to 2% away from the house to a planned outlet, so rain drains off the patio instead of toward your foundation.
- Locked perimeter and proper jointing
- Sand-set paver fields get a continuous edge restraint and a hardening joint fill, so the surface can't spread and the joints resist weeds and washout over time.
Every connection starts the same way: a free consultation and a written, itemized quote from a vetted installer, with no obligation. If your project also touches a walkway, a driveway, or a retaining wall to manage the grade, the same base-and-drainage standards apply — and you can compare cost factors across the category in our cost guides and weigh paver and stone brands in our brand directory before you decide. Patios are one project within outdoor surfaces, which is one of eight categories we cover; start from the outdoor-surfaces hub to see where your project fits, or step back to all home surfaces.
Brands & Material Authority
Quality and construction drive long-term performance more than the label. These are widely respected names in this category:
- Trex
- TimberTech
- Belgard
- Techo-Bloc
- Unilock
- Fiberon